Monthly Archives: August 2013

Redis data sharding – part 2 – hash-based keys

In my previous post on Redis data sharding i introduced the concept of data sharding/partitioning and provided a small Java code example to illustrate the idea. As you noticed i was creating fixed-size “emailbuckets”, containing 1024 emails each. An email address was the key of my hash, while user id was the value. For a shard identifier i used a simple integer value (shardKey) obtained as a result of “i mod shardSize” operation.

Whereas such approach illustrates the concept well, it’s impractical in “real life” applications. This is due to a simple reason – knowing the email address alone (which may often be the only thing you’d know at some point of the app execution flow; for example when you’re using Spring Security and requesting emails “as usernames” during sign-in process), you wouldn’t be able to retrieve the corresponding userId. If you would know the algorithm by which shardKey was generated, in this case – yes – you would be able to traverse emailbuckets one-by-one looking for the appropriate email, but without that knowledge you wouldn’t be able to tell which shard the email address you’re looking for, ended up in.

One solution to that problem is to use a different key for sharding data; something that is computed directly based on the data you’re interested in partitioning. An obvious candidate here is the email address itself. If you’d be able to generate shardKey based on email address you could reproduce the same scenario every time a user provides you with his email during signing in and retrieve his userId (which you could use later on (for example) to further query another hash in Redis – “users:id” – that stores complete user profile).


This seems like an ideal task for a hash function… Let’s start first with some background on hashing. According to Neil Coffey’s Javamex article Introduction to hashing:

  • Hashing means using some function or algorithm to map object data (eg. content of a String object) to some representative integer value. This so-called hash code (or simply hash) can then be used as a way to narrow down our search when looking for the item…


Also, when you search Wikipedia after Java hashCode() function, you’ll get the following definition:

  • In the Java programming language, every class must provide a hashCode() method which digests the data stored in an instance of the class into a single hash value (a 32-bit signed integer). This hash is used by other code when storing or manipulating the instance – the values are intended to be evenly distributed for varied inputs in order to use in clustering. This property is important to the performance of hash tables and other data structures that store objects in groups (“buckets”) based on their computed hash values.


Looks like this is exactly what we’re interested in – …evenly distributed values for varied inputs…, which …is important to the performance of data structures that store objects in groups (shards in our case) based on their computed hash values.

Conclusion: Java hashCode() function is what we’ll proceed with.


More from Wikipedia on Java hashCode():

  • Starting with Java version 1.2, the java.lang.String class implements its hashCode() using a product sum algorithm over the entire text of the string.
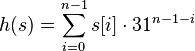
  • An instance s of the java.lang.String class, would have a hash code h(s) defined by:
    Java String hashCode()


  • where terms are summed using Java 32-bit int addition, s[i] denotes the i-th character of the string, and n is the length of s.


Now, looking at Java docs on String.hashCode() function we can read:

  • The hash code for a String object is computed as
    s[0]*31^(n-1) + s[1]*31^(n-2) + … + s[n-1]


  • using int arithmetic, where s[i] is the ith character of the string, n is the length of the string, and ^ indicates exponentiation. (The hash value of the empty string is zero.)


Finally let’s take a look at some Java code of String object showing how hashCode() has actually been implemented:

public int hashCode() {
    int h = hash;
    if (h == 0 && value.length > 0) {
        char val[] = value;

        for (int i = 0; i < value.length; i++) {
            h = 31 * h + val[i];
        }
        hash = h;
    }
    return h;
}


An alternative (faster) implementation may look like this (from Apache Harmony JDK):

public int hashCode() {
    if (hashCode == 0) {
        int hash = 0, multiplier = 1;
        for (int i = offset + count - 1; i >= offset; i--) {
            hash += value[i] * multiplier;
            int shifted = multiplier << 5;
            multiplier = shifted - multiplier;
        }
        hashCode = hash;
    }
    return hashCode;
}

what’s the difference between the two above code snippets? As you can see, multiplication can be replaced by a bitwise shift operation and a subtraction for better performance. “(multiplier << 5) – multiplier” is just 31*multiplier after all (however VMs nowadays do this optimization automatically). If you’re interested in good reading on the subject of Binary numbers i strongly recommend Neil Coffey’s Javamex article: Introduction to binary numbers.


OK, applying all this knowledge to our sharding code example results in the following implementation:

while(i<1000000) {
    String userId = String.valueOf(i++);
    String emailAddress = String.format("user_%s@mariuszprzydatek.com", userId);
    int shardKey = emailAddress.hashCode();
    redisTemplate.opsForHash().put(String.format("emailsbucket:%s", shardKey), emailAddress, userId);
}


Happy coding! 🙂


Resources:

Spring REST API hardening – exceptions handling

For some time now there’s a lot of discussion over the internet on the definition of a unified RESTful API standard (architecture, design, interfaces, etc.). RFC’s are being discussed by IETF committees trying to come up with a standard, work continues on re-designing the HTTP protocol itself (HTTPbis, by the IETF HTTPbis WG chaired by Mark Nottingham), but what we have thus far are only good and bad practices…


What i’d like to address in this post are good practices related to exceptions handling in a Java Spring MVC based RESTful API application.


Let’s start with this: In order to make your REST API more developer-friendly, you may want your MVC controllers to return (within the body of the response), some information that can assist the client developer while using your API.


Using a JSON data format, a sample controller response in situation of an exception may look like this:

{
    "code" : "SAE00202",
    "status" : "SECURITY_AUTHORITY_ERROR",
    "errors" : [ "Security Exception: Insufficient Authorization Level. Access denied" ]
}


Here’s an example of how you can achieve that easily using Spring MVC’s @ControllerAdvice annotation (which indicates the annotated class assists a “Controller” and serves as a specialization of @Component annotation, allowing implementation classes to be auto-detected through classpath scanning).

@ControllerAdvice
public class BusinessExceptionHandler extends DefaultExceptionHandler {

    @ExceptionHandler(IncompleteUserProfileException.class)
    @ResponseStatus(value = HttpStatus.PRECONDITION_FAILED)
    @ResponseBody DefaultErrorMessage handleIncompleteUserProfileException(IncompleteUserProfileException e) {

        if(debug) logException(e);

        String error = getResourceBundle().getMessage("exception.user.profile.incomplete", null, Locale.getDefault());

        return new DefaultErrorMessage("RS00302", "BUSINESS_ERROR", error);

    }

}


Aside from the fact that you may want to write custom handlers like the one above for your application-specific exceptions (Business/Security/Validation related, etc.), you may also want to “go deeper” and extend the ResponseEntityExceptionHandler class (abstract), and override the default implementation of the exceptions below; thrown usually by MVC Controllers:

Spring MVC ResponseEntityExceptionHandler Exceptions


In order to do that, first you have to start with a simple POJO representing your default error message:

public class DefaultErrorMessage {
    private String code;
    private String status;
    private List errors = new ArrayList<>();

    public DefaultErrorMessage(String code, String status, String error) {
        this.code = code;
        this.status = status;
        this.errors.add(error);
    }

    public DefaultErrorMessage(String code, String status, List errors) {
        this.code = code;
        this.status = status;
        this.errors = errors;
    }

    // getters and setters omitted
}


Having this in place, a custom implementation of BindException may look like this:

@ControllerAdvice
public class CustomResponseEntityExceptionHandler extends ResponseEntityExceptionHandler {

    @Override
    protected ResponseEntity<Object> handleBindException(BindException ex, HttpHeaders headers, HttpStatus status, WebRequest request) {

        List<String> errors = new ArrayList<>(ex.getAllErrors().size());
        List<FieldError> fieldErrors = ex.getFieldErrors();
        StringBuilder sb;

        for (FieldError fieldError : fieldErrors) {
            sb = new StringBuilder();
            sb.append("Field: ").append(fieldError.getField()).append(", ");
            sb.append("Value: ").append(fieldError.getRejectedValue()).append(", ");
            sb.append("Message: ").append(fieldError.getDefaultMessage());
            errors.add(sb.toString());
        }

        List<ObjectError> globalErrors = ex.getGlobalErrors();

        for (ObjectError objectError : globalErrors) {
            sb = new StringBuilder();
            sb.append("Object: ").append(objectError.getObjectName()).append(", ");
            sb.append("Code: ").append(objectError.getCode()).append(", ");
            sb.append("Message: ").append(objectError.getDefaultMessage());
            errors.add(sb.toString());
        }

        DefaultErrorMessage errorMessage = new DefaultErrorMessage("RQ00051", "RQ_BODY_VALIDATION_ERROR", errors);
        return new ResponseEntity(errorMessage, headers, status);

    }

}


I think you see the direction it’s heading in…


Happy coding 🙂

Cheers!


Resources:

Redis data sharding – part 1

In one of my previous posts on Redis i provided a definition of data sharding, quoting a great book “Redis in Action” authored by Dr. Josiah L Carlson:

  • “Sharding is a method by which you partition your data into different pieces. In this case, you partition your data based on IDs embedded in the keys, based on the hash of keys, or some combination of the two. Through partitioning your data, you can store and fetch the data from multiple machines, which can allow a linear scaling in performance for certain problem domains.”


Today i’d like to elaborate some more on data sharding based on IDs embedded in the keys.


Let’s start with an example of a hypothetical data stored in an Redis instance:

redis 127.0.0.1:6379>keys *
(empty list or set)
redis 127.0.0.1:6379>set emails:1 me@mariuszprzydatek.com
OK
redis 127.0.0.1:6379>get emails:1
"me@mariuszprzydatek.com"

what i did here is to use the basic String data type to store an email of a user. As you can see, i embedded user id within the key (’emails:1′). Now, if a front-end application would ask for an email address of a user with id=1, on the back-end side i would concatenate the keyword which i usually use to denote keys i store emails under (ie. ’emails’) with the id of a user (‘1’), add a colon (‘:’) in between, and this way i’ll get the resulting key (’emails:1′) i should look after while making a call to the Redis instance.


This solution is nice but if i’ll have 1 million of users registered in my system and use Redis as the data store for keeping mappings between identifier of a user and his email, i will end up with 1 million keys (’emails:1′, ’emails:2′, ’emails:3′, etc.). This is a volume my Redis instance will easily handle (see my previous post on Redis Performance Basics) and it will use little more than 190MB to store everything in the memory (so much due to a lot of overhead when storing small keys and values; the ratio is much better with large keys/values), but this is only one attribute we’re talking about – and what about firstName, lastName, etc.?. Obviously, if my system will have millions of registered users and i’d use Redis as my primary data store for users-related info, i would be running multiple instances of Redis already and based on the id of a user, route the queries to a specific instance, but there’s still a lot we can do to optimize costs prior to thinking about scaling.


Small code snippet to generate 1M of emails stored in Redis using String data structure (and Spring Data Redis mentioned in my other post).

int i = 0;
while(i<1000000) {
    redisTemplate.opsForValue().set(String.format("emails:%s", i++), "me@mariuszprzydatek.com");
}

the loop above executes in 2 mins on my Windows 8 64bit i7 laptop and the ‘redis-server’ process allocates ca 190 MB of memory.


Now, what will happen if we change the data structure let’s say to a Redis Hash?

Next code snippet and we’re getting just that:

int i = 0;
while(i<1000000) {
    String userId = String.valueOf(i++);
    String emailAddress = String.format("user_%s@mariuszprzydatek.com", userId);
    redisTemplate.opsForHash().put("emails", emailAddress, userId)
}

2 mins and 165 MB of memory allocated – a 15 % gain absolutely for free.


Let’s try with data sharding/partitioning. Another code snippet using Redis Hash data structure and there you go:

int shardSize = 1024;
int i = 0;
while(i<1000000) {
    int shardKey = i/shardSize;
    String userId = String.valueOf(i++);
    String emailAddress = String.format("user_%s@mariuszprzydatek.com", userId);
    redisTemplate.opsForHash().put(String.format("emailsbucket:%s", shardKey), emailAddress, userId);
}

2 mins later and… only 30 MB allocated – now you’re talking Mariusz!

Staggering 530 % increase in memory allocation efficiency!


Hope you enjoyed the first part of this brief tutorial.


Cheers!


Resources: